The Python programming language is characterized by simplicity, clarity and reduced syntax, among other things. Connecting SAP Data Warehouse Cloud (DWC) with the local Python environment brings several advantages. The local environment can be used as a test environment for the data flows in SAP DWC. Since the data flows so far include the Panda and Numpy frameworks, one should also limit oneself to these frameworks in the Python environment.
However, the Python environment can also be used to enrich SAP Data Warehouse Cloud with data obtained, for example, through unsupported frameworks or even read from a REST interface with Python. We show how users can connect SAP Data Warehouse Cloud with the local Python environment and thus read views from SAP DWC and write new tables to SAP DWC.
Want to bring your data warehousing to the cloud?
Read more about SAP Data Warehouse Cloud
-
How to connect SAP Data Warehouse Cloud with Power BI and Tableau
-
Follow the traces: Audit logging in SAP Data Warehouse Cloud
-
SAP Data Warehouse Cloud and Python: A winning combination
Preparations in SAP Data Warehouse Cloud
In order for the data to be read in Python and then imported back into SAP DWC, it is first necessary to prepare SAP Data Warehouse Cloud for the connection. The following steps are necessary for this:
-
Creating a database user
-
Release of the public IP address for SAP Data Warehouse Cloud
-
Release of the views for consumption
We have described which preparations need to be made in SAP Data Warehouse Cloud in another blog post. In addition, Anaconda 3 must be installed on the end device in order to use Python and the Spyder development environment. If Anaconda 3 is installed, Spyder should also be available on the end device.
Installations in Python
After opening Spyder and creating a new file, the user must perform various installations. Among others, this concerns the SQLAlchemy library. It is easier to use than the library hdbcli, because tables can be created without SQL. With regard to SQLAlchemy, two installations are required in this case: the normal framework and the HANA-specific extension. However, the installation of hdbcli cannot be dispensed with, as this library is required for authentication.

Importing the libraries
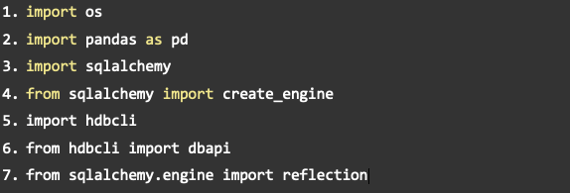
The next step is to specify the imports for the script. For this, the OS module is needed to access functions of the operating system. In addition, Panda and the previously installed library SQLAlchemy are imported. From SQLAlchemy the function create_engine is additionally required. Hdbcli and dbapi are needed to perform the authentication. The last line of code is optional, we will go into this in more detail below.

Connection to SAP Data Warehouse Cloud
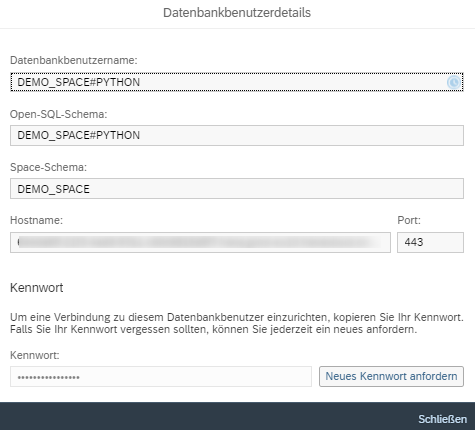
Now the script is ready to connect to SAP Data Warehouse Cloud. The first thing to do is to create the data of the created database user. They can be found in the space management of SAP DWC in the info dialog box of the corresponding database user.


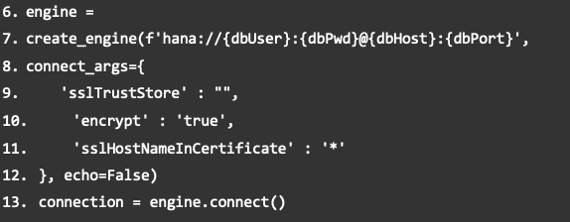
Next, the create_engine function must be called. It contains the specified data of the database user. It is important that the item “encrypt” is set to “true”, otherwise SAP Data Warehouse Cloud will not allow the connection.

If the following error message appears, make sure that the correct IP address has been shared. You can check it for example on the page WhatIsMyIPAddress.com.

Reading views
To read a view, the name of the view must first be written to a variable. Thereby the upper and lower case plays an important role. Then the specified view can be read out with the Panda function read_sql_table and output to the console with “print”.

Creating a view in SAP DWC
The creation of the DataFrame should serve as a simple example. At this point, any table can be created. The important part is the second column where the table is written to SAP Data Warehouse Cloud. The name is arbitrary, in our example it is “TableOfPython”. The variable con, on the other hand, should be assigned the variable in which engine.connect() was stored. “Index” specifies whether the table should have an index or not. “If_exists” is assigned with “replace” so that the table is overwritten if a table with the same name already exists.

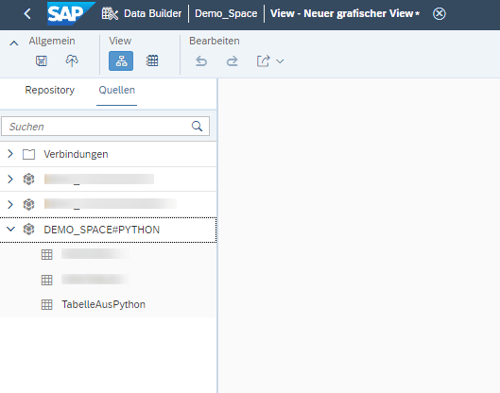
After the script has been executed, the table can be found in SAP Data Warehouse Cloud. The user can now create a new view, see the table under Sources/Database Users and use it for modeling.

And what is „reflection“?
In the imports, the library reflection was optionally suggested. It is not mandatory for the connection, but it offers exciting possibilities. Because with this function the metadata of the view can be read out, for example.

![IBacademy_Logo_blau[496] IBacademy_Logo_blau[496]](https://www.ibsolution.com/hs-fs/hubfs/IBacademy_Logo_blau%5B496%5D.jpg?width=200&name=IBacademy_Logo_blau%5B496%5D.jpg)


